Transforming Intrusion Detection: A Step-by-Step Guide to Implementing Context-Aware AI with SnortML and Autonomous Agents
Introduction
Traditional intrusion detection systems rely on signature matching to flag known threats. But as attacks evolve, this approach struggles against novel or obfuscated attacks. The next frontier is context-aware detection powered by machine learning and autonomous agents. Instead of asking “does this match a known pattern?”, modern systems ask “does this behavior make sense in context?”. This guide walks you through the process of upgrading your intrusion detection architecture using SnortML and agentic AI, turning your sensor into a thinking system that continuously learns and adapts.
What You Need
- Existing Snort installation (version 3.0 or later recommended)
- Python 3.8+ environment with libraries: scikit-learn, pandas, numpy, tensorflow or pytorch
- Access to labeled network traffic datasets (e.g., CICIDS2017, UNSW-NB15)
- A dedicated server or VM with at least 8GB RAM and multi-core CPU (GPU optional for deep learning)
- Familiarity with basic machine learning concepts and network security
Step-by-Step Guide
Step 1: Assess the Limitations of Signature-Based Detection
Before making the shift, you need to understand why signature-based methods fail. They cannot detect zero-day exploits, polymorphic malware, or attacks that blend in with legitimate traffic. Start by reviewing your current Snort logs and identifying false negatives. This baseline will help you measure improvement later.
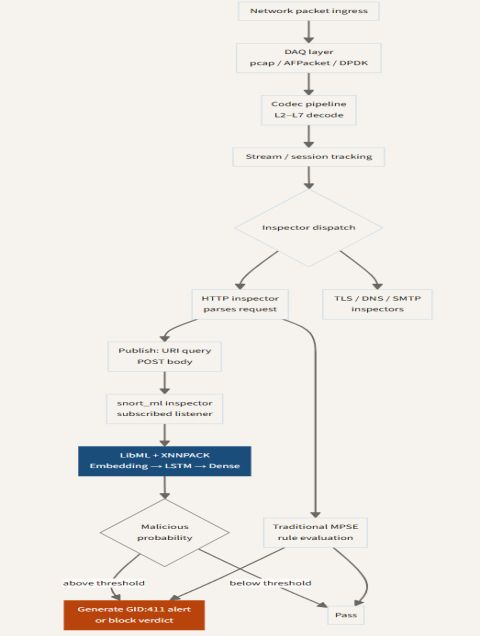
Step 2: Install and Configure SnortML
SnortML extends Snort with machine learning capabilities. Download the latest SnortML plugin from the official repository. Compile it against your Snort version. Configure snort.lua to enable the ML module:
ml = {
  enabled = true,
  model_path = "/etc/snort/models/context_model.pb",
  threshold = 0.85
}
Test the configuration with snort -T -c /etc/snort/snort.lua.
Step 3: Prepare and Train a Context-Aware Model
Collect a diverse set of network flows that include both normal and attack traffic. Use feature extraction to create a dataset with attributes like packet length, inter-arrival times, protocol distribution, and connection states. Train a classifier (RandomForest or LSTM) to distinguish malicious from benign behavior based on context – e.g., time of day, user agent patterns, or device roles. Save the model in TensorFlow SavedModel format.
Step 4: Integrate the Model with Snort via SnortML
Place the saved model in the path specified in Step 2. SnortML will load the model on startup and run inference on each flow. Adjust the threshold to balance precision and recall. For example, a lower threshold catches more anomalies but may increase false positives. Run Snort in inline mode for real-time blocking, or passive mode for monitoring.
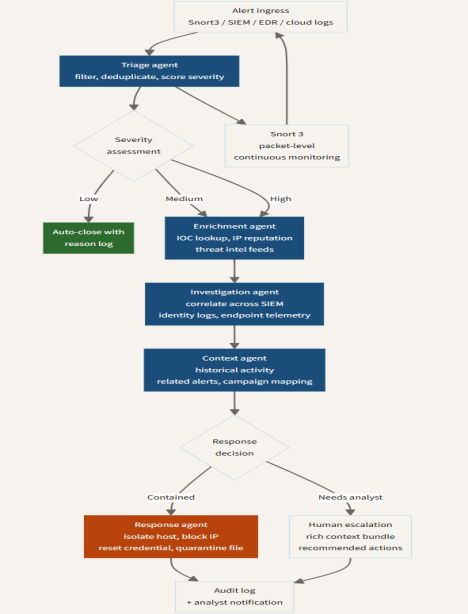
Step 5: Deploy Autonomous Agents for Adaptive Behavior
Agentic AI enables your sensor to take actions without human intervention. Write a Python agent that subscribes to Snort alerts and triggers automated responses. For example, if SnortML detects an anomalous flow to a high-value asset, the agent can dynamically update firewall rules, block the source IP, or isolate the affected device. Use a framework like Rasa or LangChain to give the agent natural language reasoning capabilities, allowing it to query context databases.
Step 6: Evaluate and Iterate
Monitor performance metrics: detection rate, false positive rate, and latency. Compare against your baseline from Step 1. Use feedback loops to retrain the model periodically. Implement A/B testing: run two Snort instances (one signature-only, one with ML) and compare alerts. Document findings and adjust your model architecture as new attack vectors emerge.
Tips for Success
- Start small: Deploy the ML model in passive mode first to avoid disrupting production traffic.
- Label data carefully: Poor labeling leads to unreliable context understanding. Use a combination of automated labeling and expert review.
- Keep human oversight: Autonomous agents should escalate high-confidence alerts to a security analyst before taking irreversible actions.
- Monitor drift: Network behavior changes over time. Schedule monthly retraining sessions using fresh data.
- Combine signatures with ML: Don't abandon signatures entirely – use them as an additional layer for known threats while ML catches unknowns.
By following these steps, you can evolve your intrusion detection from a static rule-based system to a dynamic, context-aware defense that thinks for itself. The future of network security is not just detecting patterns – it's understanding intentions.